Cost centers
A cost center represents an area or department within your organization's structure. Each cost center allows you to isolate, monitor, and analyze the costs and expenses of a specific sector, thereby, enabling more precise financial analysis and informed decision-making at both individual and collective levels.
Cost centers can be used across key modules:
-
Cash flow analysis
-
Financial contracts
-
Financial planning
Note: Cost center usage is optional and can be enabled or disabled by a Cash Management administrator.
Additionally, cost centers may be defined for access control. Non-administrator users can be restricted to specific cost centers or structures.
Access the Cost Centers page
Navigate to  Cash Flow Settings > Cost Centers
Adding cost centers
Cost centers can be added manually or imported through a spreadsheet.
To manually add a cost center, complete the fields:
-
Access the Cost centers page.
-
Click
 .
. -
Complete the fields:
-
Structure: A sequence of numbers, letters, and dots that organizes cost centers hierarchically.
-
Key: A unique identifier consisting of numbers and or letters.
-
Name: The name of the cost center.
-
Level: Choose between:
-
Aggregate (synthetic): A top-level grouping.
-
Input (analytical): A detailed, bottom-level cost center. When creating input-level cost centers, additional functionality is available:
-
Categories: Select a predefined business-specific category for the Input-level cost center. See Manage Categories.
-
External Mapping: Select an external cost center to connect Cash Management data with external financial systems. See Map to External Cost Centers.
-
-
-
-
After you have entered all the required fields, click
 .
.
Add sub-level cost center
Sub-level cost centers can be added to first-level aggregate cost centers.
-
On the Cost center page, hover over an existing cost-center. If it is a first-level aggregate cost center, Add appears to the right of the cost center name.
-
Click Add next to the existing cost center to create a sub-level.
-
Fill in the same fields as adding a cost center above. The hierarchy is maintained through the Structure field format.
-
After you have entered all the required fields, click
.
Manage categories
Categories are available for Input-level cost centers. They are optional but help organize cost centers effectively.
-
Select an input cost center .
-
In the Categories drop-down. choose Categories list (initially empty). The List of Categories page appears.
-
Click
and enter a Key (unique identifier) name and Name for the category. -
Add categories and save each one individually.
-
Assign categories to input cost centers as needed.
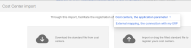
Import cost centers
Note: Internal and external cost center files must be prepared and imported separately. Each template includes step-by-step instructions and examples.
Import internal cost centers
Users can export an editable XLSX template, input information directly into the spreadsheet, and re-import it back into the system.
To import an internal cost center file:
-
Click
 . The Cost Center import page appears.
 -
Choose this import option: Cost centers, the application parameter .
-
Click in the Download panel to download the file..
-
Fill in the required data in the spreadsheet.
-
Return to the same page and click in the Import panel.
-
Navigate to the completed template on your computer.
-
Click
 to upload the completed file .

Import external cost centers
-
Click
. The Cost Center import page appears. -
Choose this import option: External mapping, the connection with my ERP .
-
Click in the Download panel to download the file..
-
Fill in the required data in the spreadsheet.
-
Return to the same page and click in the Import panel.
-
Navigate to the completed template on your computer.
-
Click
to upload the completed file .
Map to external cost centers
External Mapping for external cost centers is available for Input-level cost centers. External cost centers are used to connect Cash Management data with external financial systems and must be configured to integrate financial data into the application.
-
Click the External Mapping tab.
-
Click
. -
Enter a Key (unique identifier) and Name and save to register it.
Move cost centers
Using the Move to tab, you can reposition Input-Level cost centers within the cost center structure.
-
On the Cost centers table, choose the one you want to move.
-
Click the Move to tab.
-
From the drop-down list, select another cost center.
-
Click
.
Delete cost centers
Note: You can delete a cost center only if it is not linked to any integrated documents.
Delete a cost center
-
Go to the Cost centers table
-
Find and select the cost center you want to delete.
-
Click
 .
. -
Confirm your action.
Delete an external cost center
-
Click the External Mapping tab.
-
Select the cost center you want to delete.
-
Click
. -
Confirm your action.
Using cost centers
Cost centers are used in:
-
Cash Flow Settings > Entities
-
Options Settings > Special functions
-
Registration Settings > Users
-
Option Settings > System Settings
-
Dashboards
-
Cash flow
-
Contracts
-
Financial planning
-
Integrations > Documents